Control Model
The FleCSI control model allows users to define the high-level structure of an application using a control-flow graph (CFG) of control points, under each of which, a directed acyclic graph (DAG) of actions can be defined.
For FleCSI developers, the control model replaces the normal hard-coded execution structure of an application, instead providing a well-defined, extensible mechanism, which can easily be verified, and visualized.
Consider the following example of a traditional implicit control model:
int main(int argc, char ** argv) {
  int step{0}, steps{0};

  // initialization stage
  initialize(steps);

  while(step<steps) {
    // simulation stages
    advanceA();
    advanceB();
    advanceC();

    // analysis stages
    analyzeA();
    analyzeB();
    analyzeC();
  } // while

  // finalization stage
  finalize();
} // main
While this example is straightforward, it is also restrictive because it defines a single point in the application where all stages must be known. Suppose that an advanced user would like to add an advance or analysis stage to the simulation, e.g, to test a new algorithm, or to customize their metrics? With the traditional model above, she would need to have access to the code base, and would have to rewrite the main simulation loop with the new execution logic. This is error prone, and worse, it necessarily forces the code to diverge (unless every alteration to the application is vetted and merged).
FleCSI’s control model offers a much cleaner solution, which is both easier for the user, and safer for the core application developers. There are other advantages for advanced users and core application developers that should become apparent from the tutorial examples.
Control-Flow Graphs & Directed Acyclic Graphs
Fig. 2 shows a complete representation of a FleCSI control model.
This figure was actually generated by a FleCSI example application using
the --control-model flag, which outputs a dot file of the control
model.
The white control-point nodes in the figure (labeled: Control Point X)
define a control-flow graph. Notice that the control points do not form
a DAG, i.e., they cycle (indicated by the dashed line from Control
Point 3 to Control Point 2).
This is true, in general, and allows users to create complex looping
structures within their applications.
At each control point in the CFG, there are one or more actions defined, e.g., under Control Point 2 are the actions A through E. The actions are where the actual work of the simulation is executed.
Important
The actions in a FleCSI control model are not tasks! The control model capability in FleCSI is orthogonal to Legion’s tasking model, i.e., they are complementary. FleCSI actions are functions that execute tasks! When the Legion backend to FleCSI is in use, the control model exposes a sequential program order to the Legion runtime that can be analyzed for data dependencies to increase concurrency, and allow load balancing during execution.
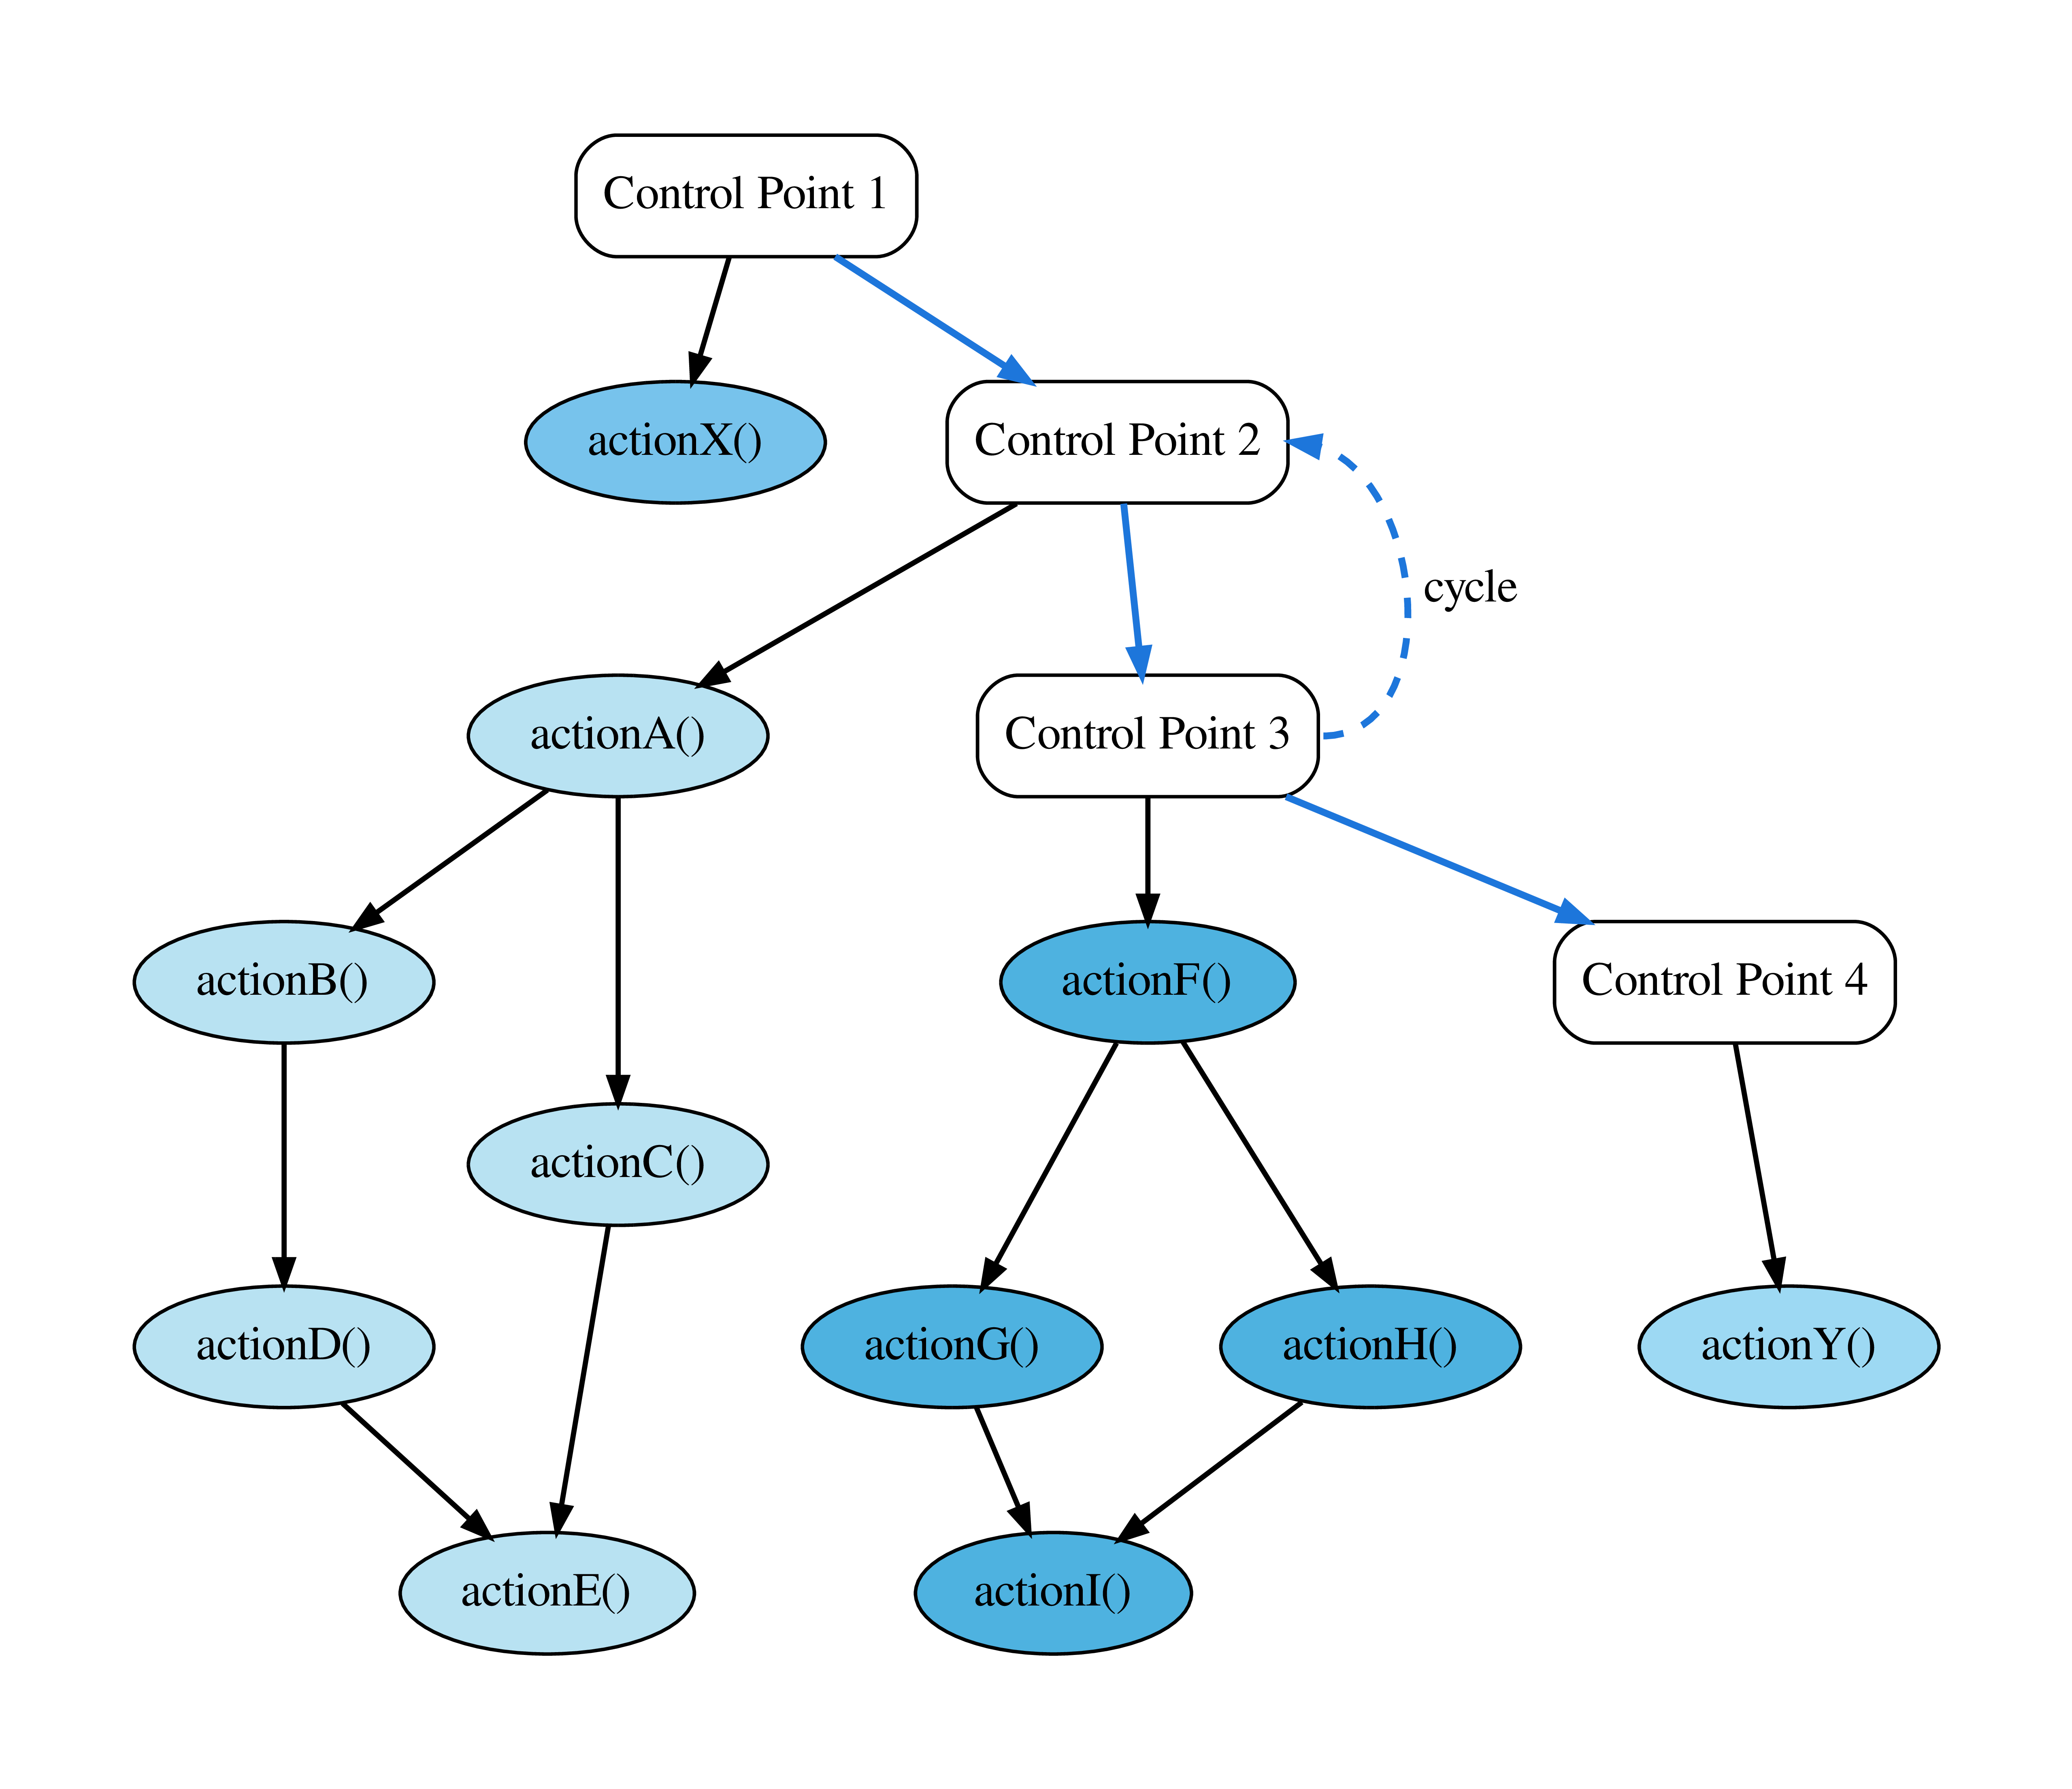
Fig. 2 Example FleCSI Control Model.
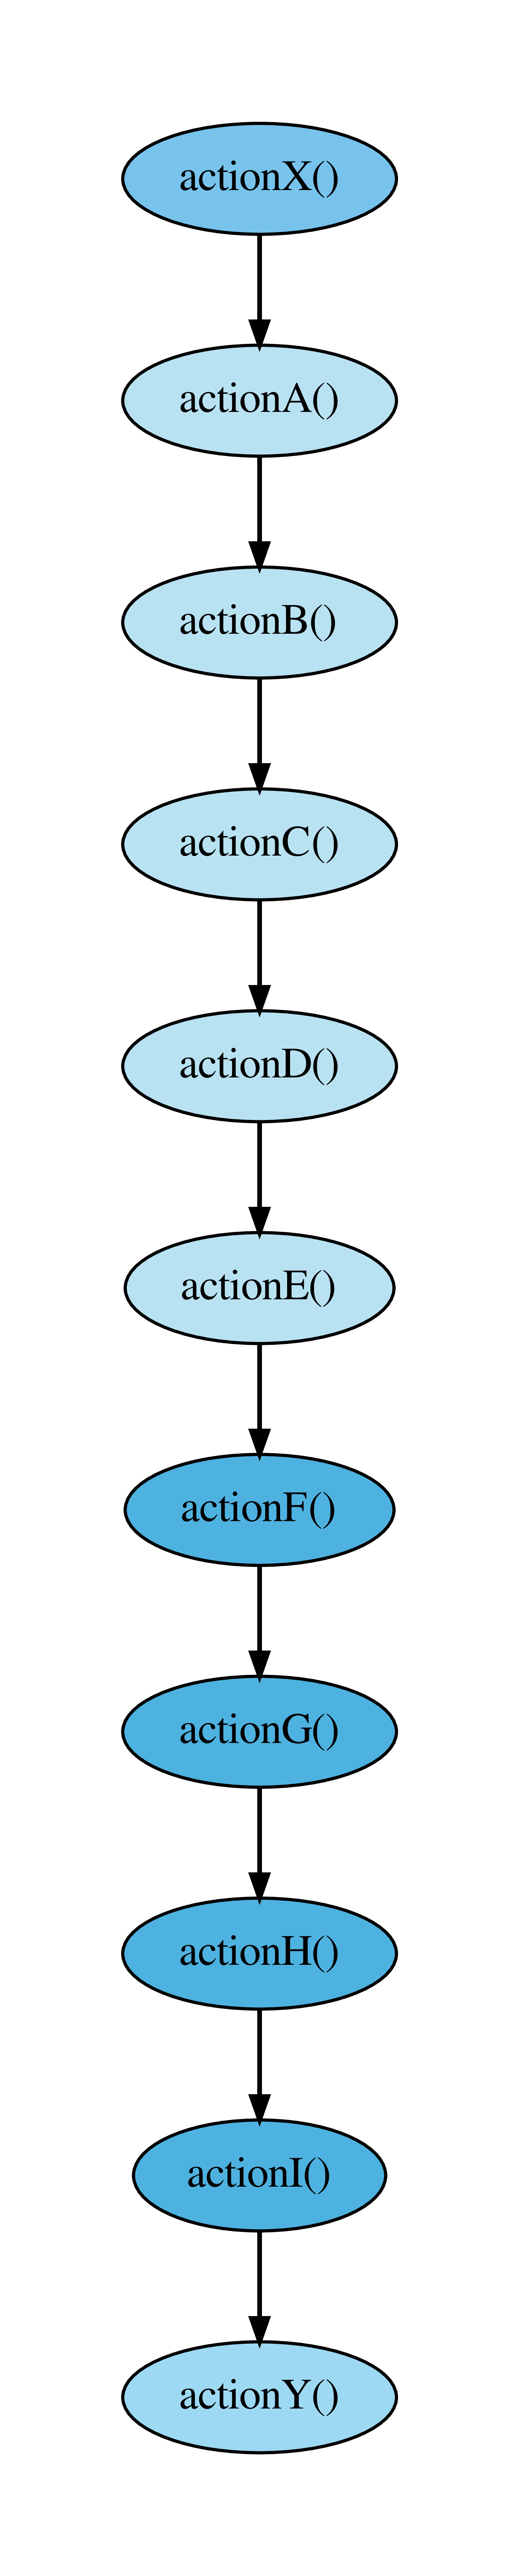
It is important to notice that actions have dependencies, and that they
are DAGs.
This allows the FleCSI runtime to topologically sort the actions into a
single valid sequential ordering.
This ordering uses the fact that the control point order is defined by a
specialization of the core FleCSI control type.
FleCSI then sorts each DAG of actions to create the overall sequential
ordering (Fig. 3).
This ordering is non-unique, but is deterministic for a given FleCSI
control model, i.e., the same code and compiler version will generate
the same ordering every time.
Fig. 3 was also generated by a FleCSI example program by
passing the --control-model-sorted flag.
FleCSIbility
Another important attribute of the FleCSI control model is that actions and dependencies do not need to be defined in a centralized location in the code. This adds significant flexibility in extending the actions that a simulation executes.
Let’s consider our advanced user who would like to add a new action: Because FleCSI does not force her to add actions to a static loop, she can instead put it in a source file that only needs to link to the control points definition of the application. She still has to build an application driver. However, if the application packages are primarily developed as libraries, this is easy to do.
Without going into the specific details yet, inserting a new action N under Control Point 2 would look something like this:
control::action<actionN, cp::two> action_n;
const auto dep_na = action_n.add(action_a);
const auto dep_bn = action_b.add(action_n);
That’s it! This will insert a new action that depends on action A, and which is depended upon by action B (Fig. 4). Because of FleCSI’s data model, any data dependencies will automatically be honored by the runtime. For example, if action N modifies a pressure field that is used by action B, the underlying runtime will recognize this dependency, and the data will be consistent. This code can also be in its own source file, which means that the original package does not need to be modified. Of course, the core application developers need to document the control point identifiers, and actions, so that our advanced user knows the correct names to use. However, this is a small cost to allow easy experimentation and extension of the application.
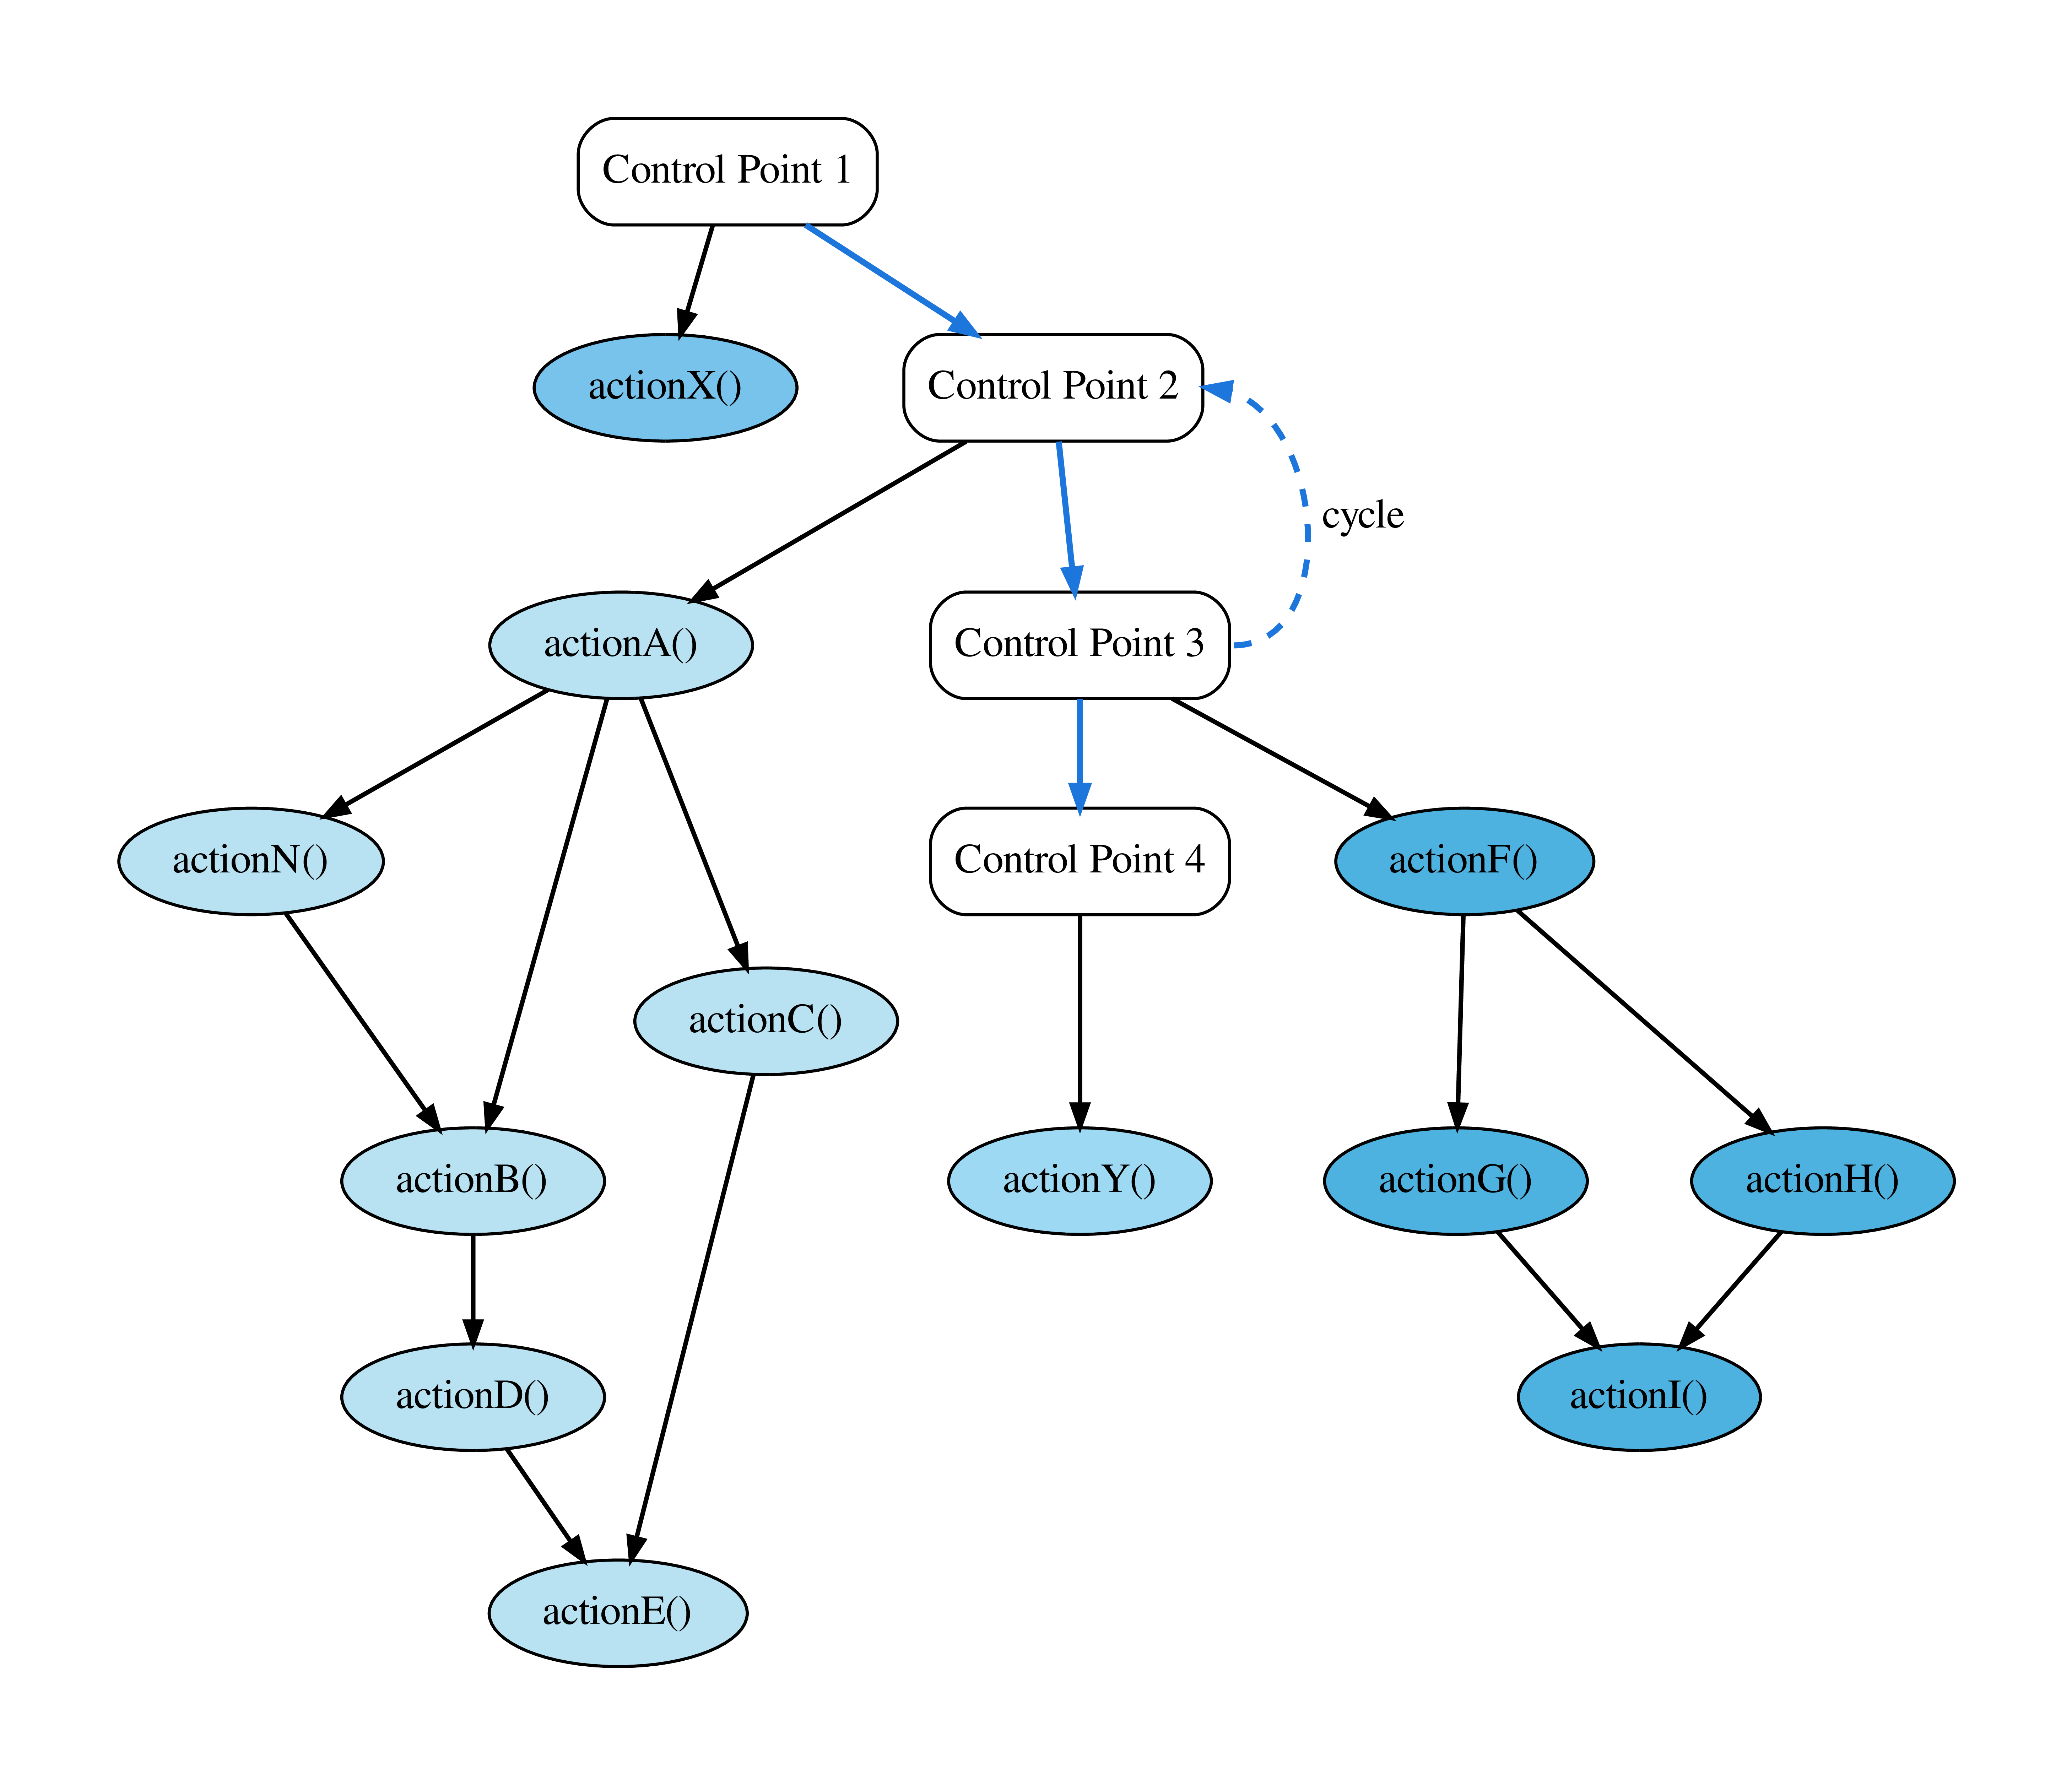
Fig. 4 Control Model After Extension.
Examples
The rest of this tutorial demonstrates how application developers can use the FleCSI control model to create extensible applications. We begin with an extremely simple control model, but quickly build to a more realistic example.
Attention
This tutorial breaks our convention of avoiding details of the FleCSI specialization layer (We lied to you in the tutorial introduction!). This is necessary to demonstrate how the code for this example works. In general, the control model for an application will be defined by the specialization developer, with a fixed set of documented control points that are not modifiable by the application developer. Users of the specialization (application developers) will add actions that define the substance of the simulation.
Example 1: Simple
This example will show you how to construct the simplest non-trivial control model that might make sense for an application. Fig. 5 shows the control model, which has three control points (initialize, advance, and finalize) with one action under each. This is still not a very useful example because it lacks cycles (introduced in the next example). However, it will serve to introduce the definition of a control model from the core FleCSI type.
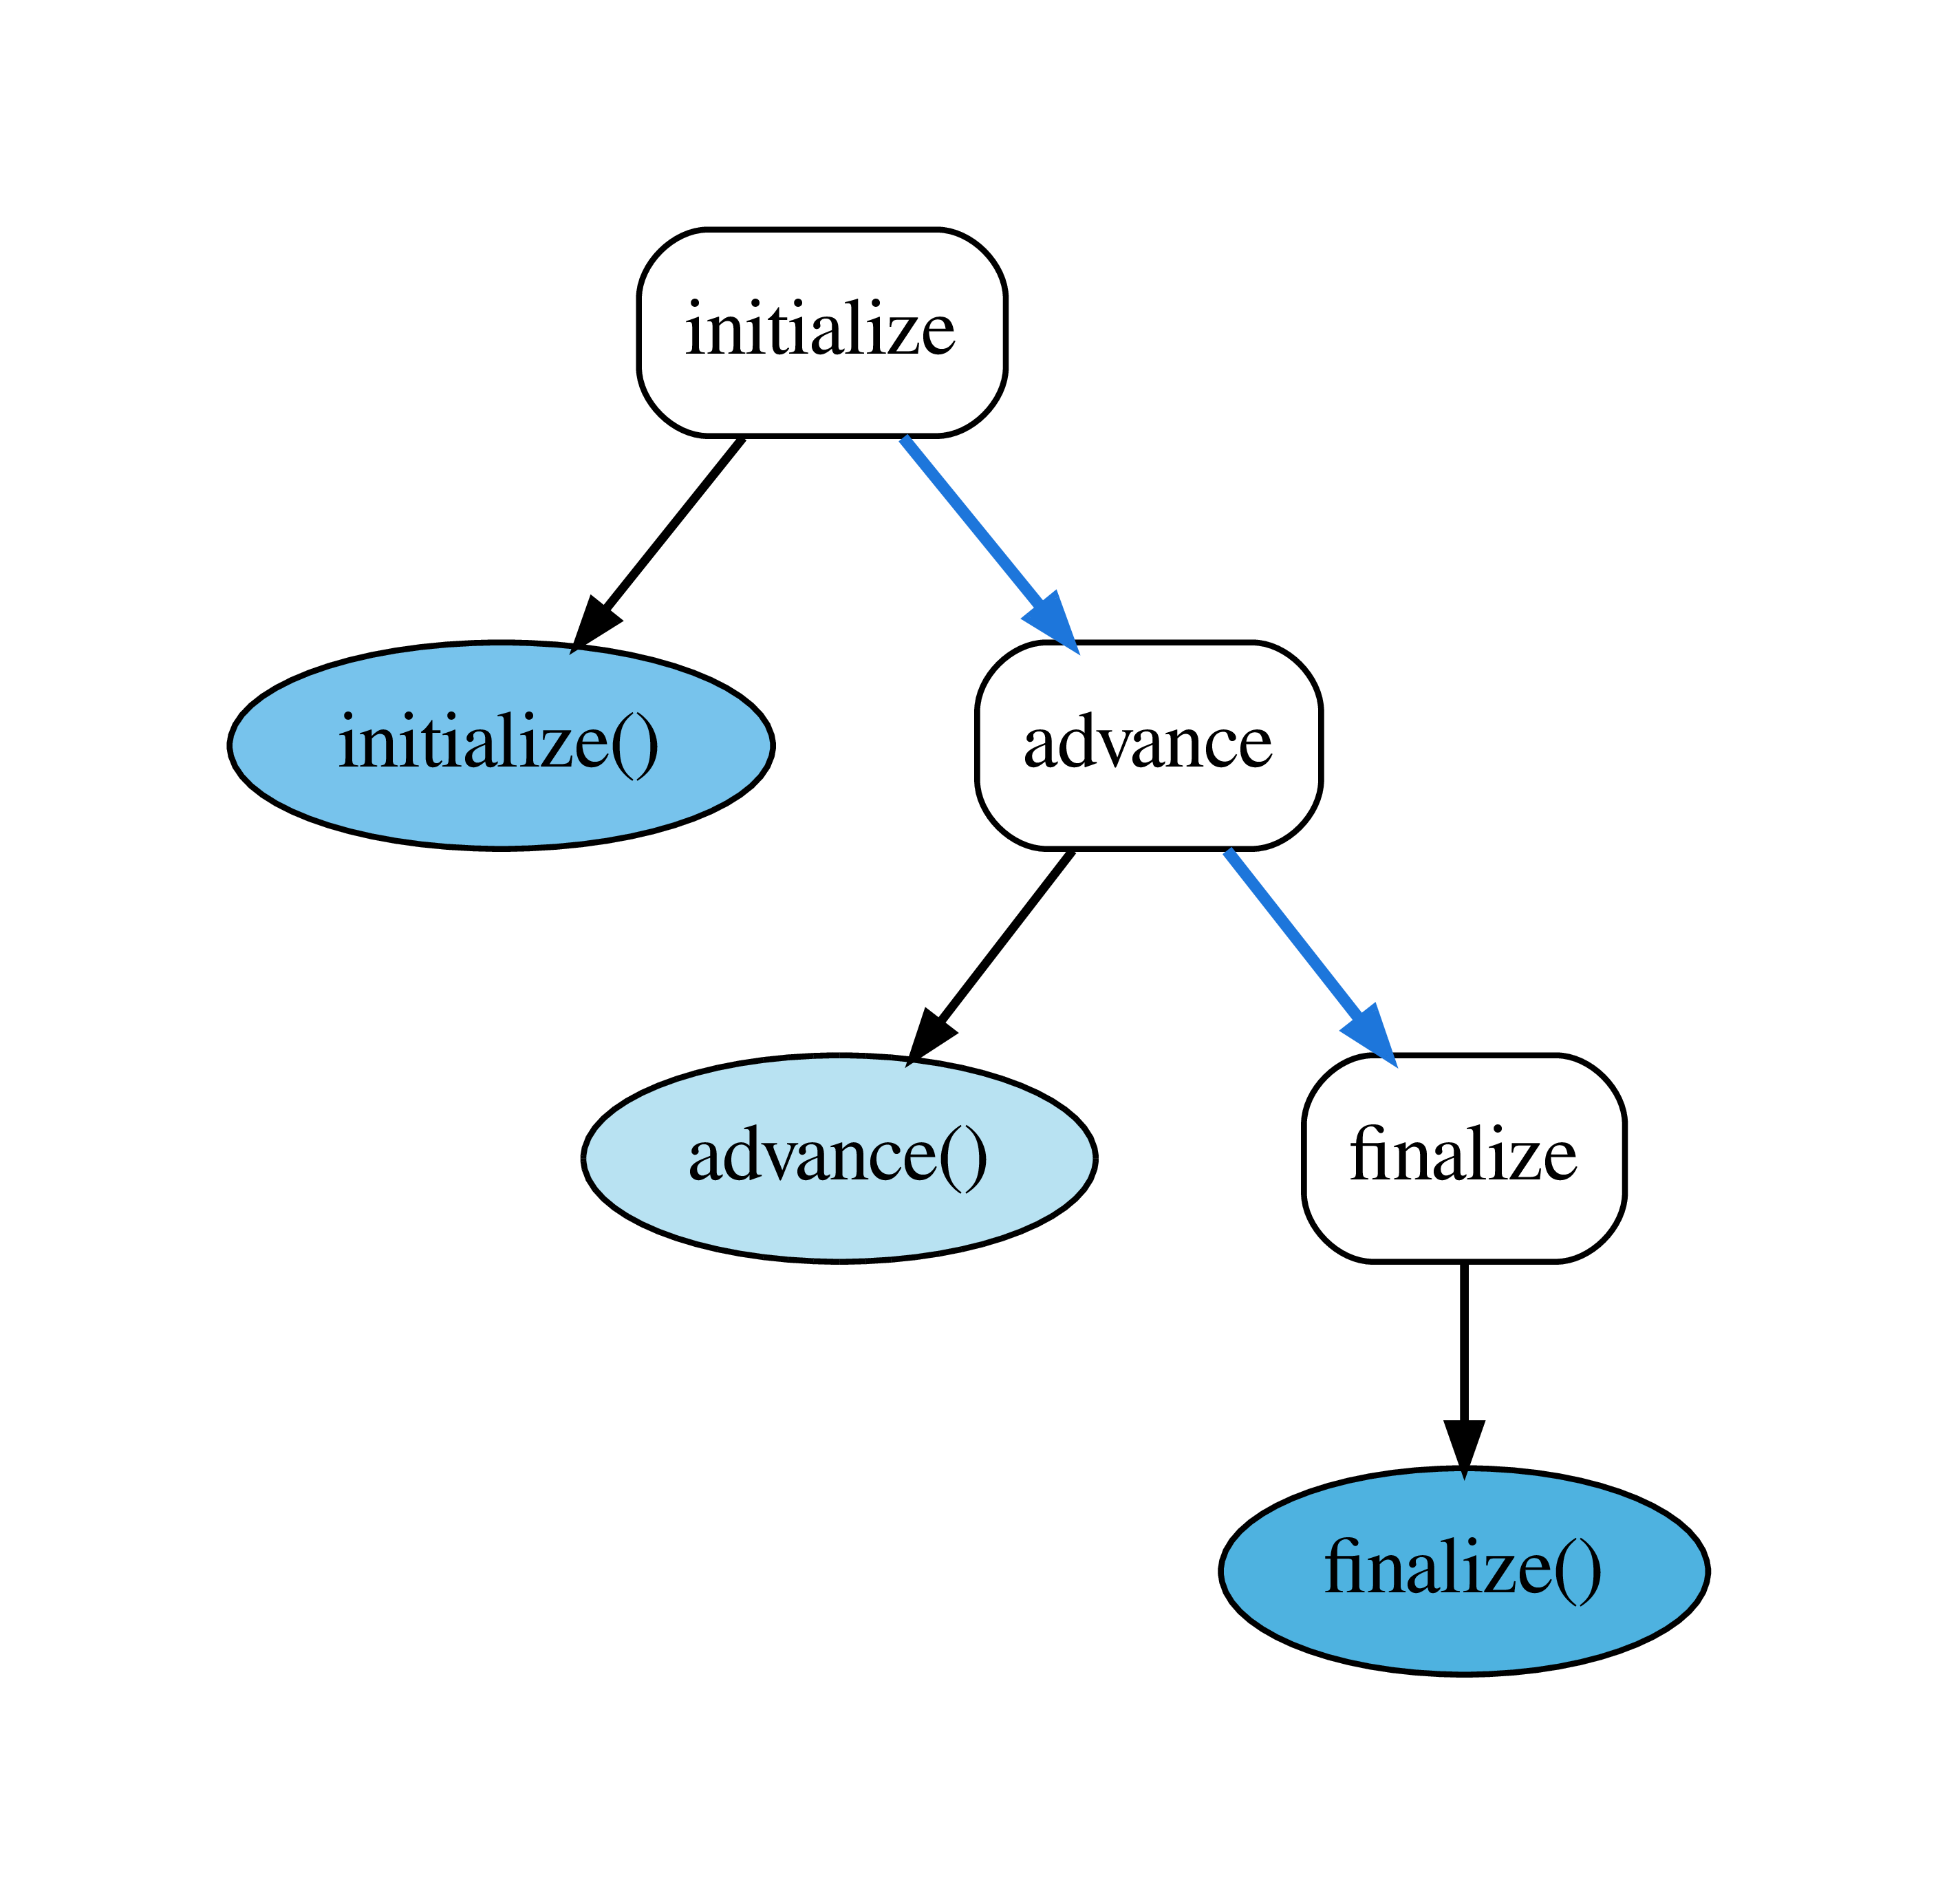
Fig. 5 Control Model for Example 1.
Tip
This example introduces the notion of a policy type. Policies are C++ types (structs or classes) that can be used to define the behavior of another templated C++ type. This design pattern was introduced by Andrei Alexandrescu in Modern C++ Design. The details of the design pattern are not important to this example, but may make interesting reading. For our purposes, a policy is simply a C++ struct that we pass to the core control type.
Defining Control Points
The first thing about a control model is the control points. To define these, we use an enumeration. Consider the following from tutorial/2-control/1-simple.hh:
/*
  Enumeration defining the control point identifiers. This will be used to
  specialize the core control type.
 */

enum class cp { initialize, advance, finalize };
The name of the enumeration (cp) is arbitrary. However, it is useful to make it concise because it will be used in the application code (This is not precisely true because the specialization developer may choose to define helper types for registering actions, but it is true for this example.) At any rate, the name is not important because it will be used as a type definition in our control policy.
In addition to the enumeration itself, we also define an operator overload of the * operator (function call operator overloading):
/*
  Define labels for the control points. Here we use function call operator
  overloading of the '*' operator. This approach is safer than defining a satic
  array of string literals because it is type-safe, and it allows error
  checking.
 */

inline const char * operator*(cp control_point) {
  switch(control_point) {
    case cp::initialize:
      return "initialize";
    case cp::advance:
      return "advance";
    case cp::finalize:
      return "finalize";
  }
  flog_fatal("invalied control point");
}
Perhaps this looks complicated, but really all it does is to return a string literal given one of the control point enumeration values defined in cp. This approach is used by FleCSI because it is safer than defining a static array of string literals. The labels are used to create visualizations of the control model.
The following defines the actual control policy (We will discuss the individual parts.):
  Control policy for this example. The control policy primarily defines types
  that are used by the core control type to define the control-flow model for
  the program. For this simple example, the policy captures the user-defined
  enumeration of control-points identifiers, defines an empty node policy, and
  defines the order of control point execution using std::tuple.
 */

struct control_policy {

  /*
    Capture the control points enumeration type. This type is used in the
    control policy interface whenever a control point is required.
   */

  using control_points_enum = cp;

  /*
    The actions that are added under each control point are used to form a
    directed acyclic graph (DAG). The node_policy type allows the user to add
    interfaces and data that are available from, and are carried with the
    action. A more complex example will demonstrate this capability.
   */

  struct node_policy {};

  /*
    This is a convenience type definition that provides typeification of an
    integer value.
   */

  template<auto CP>
  using control_point = flecsi::control_point<CP>;

  /*
    The control_points tuple defines the actual control points as typeified
    integers derived from the control point identifiers from the user-defined
    enumeration.
   */

  using control_points = std::tuple<control_point<cp::initialize>,
    control_point<cp::advance>,
    control_point<cp::finalize>>;
};

/*
The first type definition in the policy captures the control points enumeration type. This type is used in the control interface for declaring actions:
    Capture the control points enumeration type. This type is used in the
    control policy interface whenever a control point is required.
   */

  using control_points_enum = cp;
The next type is the node_policy. Each set of actions under a control point forms a DAG. Specifying a non-trivial node policy allows the user to add additional interfaces and data to an action. In this simple example, the node type is empty:
    The actions that are added under each control point are used to form a
    directed acyclic graph (DAG). The node_policy type allows the user to add
    interfaces and data that are available from, and are carried with the
    action. A more complex example will demonstrate this capability.
   */

  struct node_policy {};
The actual control points are defined as a std::tuple of the typeified integer-valued control points enumeration. The templated control_point definition is a convenience interface for typeifying the control points:
    This is a convenience type definition that provides typeification of an
    integer value.
   */

  template<auto CP>
  using control_point = flecsi::control_point<CP>;

  /*
    The control_points tuple defines the actual control points as typeified
    integers derived from the control point identifiers from the user-defined
    enumeration.
   */

  using control_points = std::tuple<control_point<cp::initialize>,
    control_point<cp::advance>,
    control_point<cp::finalize>>;
};
In the above control_points tuple definition, the order is important, as it is the order in which the control points will be sorted, and thus executed.
Finally, after the control policy, we define a fully-qualified control type. This is the control type that we will use in our example application.
  Define a fully-qualified control type for the end user.
 */

using control = flecsi::control<control_policy>;
That’s the entire control policy for this example. Without comments, it is about 20 lines of code. Let’s see how we use it!
Using the Control Interface
The source for this example is in tutorial/2-control/1-simple.cc. Much of the actual main function is the same as in the previous examples. Let’s first consider the parts that are different.
As referenced earlier, the control type adds some command-line options to
the program.
These options allow the user to output dot files for visualizing the
control model and resulting sequential ordering of the registered
actions, --control-model, and --control-model-sorted,
respectively.
To enable these options, we must call a the method that checks for them,
and exit the program if they have been invoked.
Although it is not strictly necessary to end execution after invocation
of the control model outputs, it is generally desirable to do so for a
real simulation program, which may run for many minutes or hours
otherwise:
  /*
    The check_options() method checks to see if any control-model options were
    specified on the command line, and handles them appropriately.
   */

  status = control::check_options();

  /*
    Check the return after control-model checks. Because this is after
    initialization, we need to call finalize if the program is exiting.
   */

  if(status != flecsi::run::status::success) {
    flecsi::finalize();
    return status == flecsi::run::status::control ? 0 : status;
  } // if
The last part of the main function is not really different from previous examples, we just have a better understanding of it now. Passing the execute method of our control model to FleCSI’s start function tells FleCSI to run the control model, which will execute all of the cycles, and actions registered on the control model:
  /*
    Pass the control model's 'execute' method to start. FleCSI will invoke
    the execute function after runtime initialization. This will, in turn,
    execute all of the cycles, and actions of the control model.
   */

  status = flecsi::start(control::execute);
Now that we have defined the control model, and added it to our runtime setup, the only thing that remains is to add some actions under the control points.
As stated, actions are nothing more than C/C++ functions. For this example, there are three actions, which all have the same form. We list only the initialize function here:
/*
  Function definition of an initialize action.
 */

int
initialize() {
  flog(info) << "initialize" << std::endl;
  return 0;
}
To register an action with the control model, we declare a control action:
/*
  Register the initialize action under the 'initialize' control point.
 */

control::action<initialize, cp::initialize> initialize_action;
The template parameters to control::action are the function pointer initialize, and the control point cp::initialize (This is why it can be expedient to use a concise enumeration type name.)
Running this example prints the output of each of the three functions.
[info all p0] initialize
[info all p0] advance
[info all p0] finalize
Not very interesting, but you should begin to see the simplicity of defining and using a FleCSI control model.
Important
To generate an image of the control model for this example, try:
$ ./simple --control-model
This will output a graphviz file simple-control-model.dot that can be rendered into various image formats:
$ dot -Tjpg simple-control-model.dot > simple-control-model.jpg
$ dot -Tpng simple-control-model.dot > simple-control-model.png
$ dot -Teps simple-control-model.dot > simple-control-model.eps
For a list of supported output formats, try:
$ dot -T?
If you used spack to build the dependencies for FleCSI, the version of dot that it installs does not support the PDF format. To generate a nice looking PDF of the graph, try:
$ dot -Teps simple-control-model.dot > simple-control-model.eps
$ ps2pdf14 -dPDFSETTINGS=/prepress -dEPSCrop simple-control-model.eps
Example 2: Cycles
Fig. 6 shows a slightly more realistic control model that cycles over advance and analyze control points. This example demonstrates how to add a cycle.
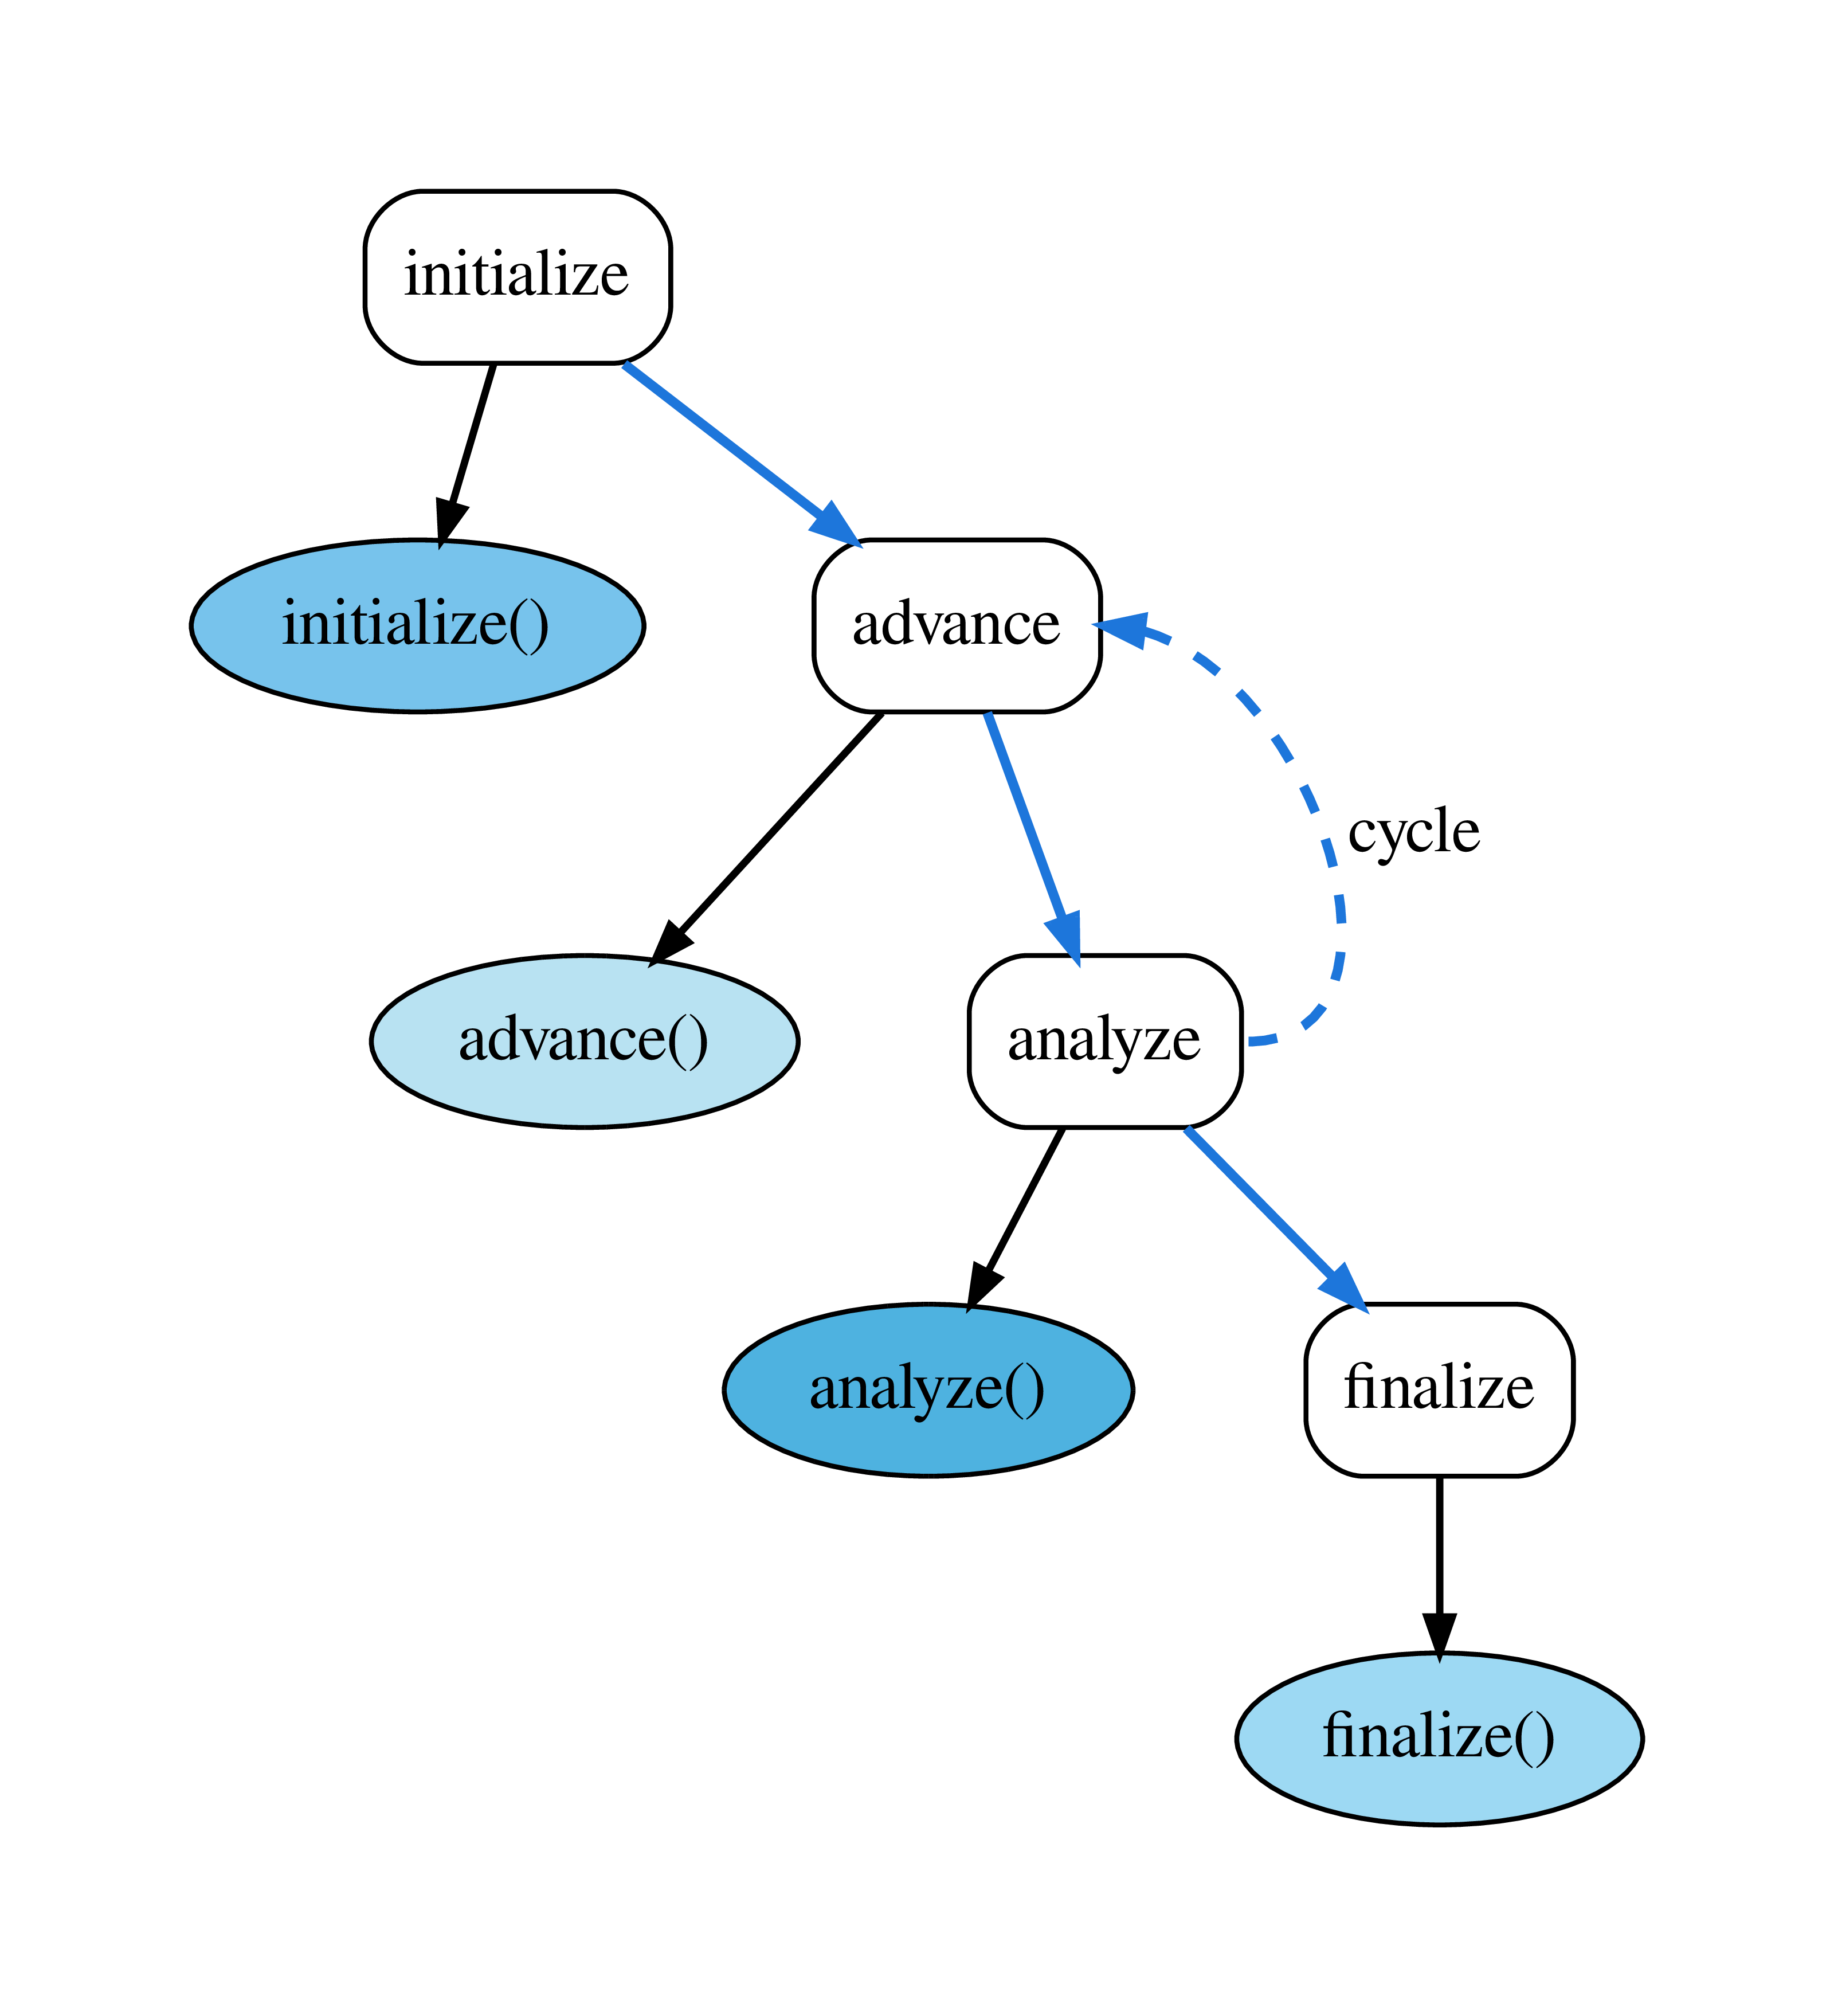
Fig. 6 Example FleCSI Control Model with Cycle.
Starting from the previous example, we add the analyze control point:
enum class cp { initialize, advance, analyze, finalize };

inline const char * operator*(cp control_point) {
  switch(control_point) {
    case cp::initialize:
      return "initialize";
    case cp::advance:
      return "advance";
    case cp::analyze:
      return "analyze";
    case cp::finalize:
      return "finalize";
  }
  flog_fatal("invalied control point");
}
We will use cp::advance and cp::analyze to define the cycle from the core FleCSI cycle type:
  /*
    The cycle type. Cycles are similar to the control_points tuple, with the
    addition of a predicate function that controls termination of the cycle.
   */

  using cycle = flecsi::cycle<cycle_control,
    control_point<cp::advance>,
    control_point<cp::analyze>>;
Cycles are similar to the control_points tuple, with the addition of a predicate function that controls termination of the cycle:
  /*
    The core FleCSI control model inherits from the control policy, so that
    any data members defined in your policy are carried with the control
    policy instance, and can be accessed through a static interface.
   */

  static bool cycle_control() {
    return control::instance().step()++ < 5;
For this example, the control function simply iterates for five cycles. In a real application, the control function could be arbitrarily complex, e.g., invoking a reduction to compute a variable time step.
Tip
As stated above, the core control type uses a policy design pattern. One important aspect of this pattern is that the host type (in this case the core control type) inherits from the policy type (the control_policy type). This allows the specialization to add data members that will be carried with the control instance.
Notice that the cycle_control function is static, and uses the instance method to access the single instance of the control object. The singleton instance can access any data members that have been added to the policy. In this case, we use it to access the step_ data member that keeps track of which simulation step we are on:
Although this example is simple, in general, we can use this design pattern to access simulation control state variables.
The last piece needed to add the cycle is the actual definition of the control_points tuple type:
  /*
    The control_points tuple type takes the cycle as one of its
    elements. Valid types for the control_points tuple are, therefore,
    either typeified enumeration values, or cycles.
   */

  using control_points = std::
    tuple<control_point<cp::initialize>, cycle, control_point<cp::finalize>>;
Other than adding an action under the new analyze control point, the main function for this example is the same.
Important
The core cycle type itself can contain a mixture of typeified enumeration values and cycles, such that cycles can be nested. It seems unlikely that most HPC simulations would need more than a couple of levels of cycling. However, FleCSI supports arbitrary cycle depths. Fig. 8 shows a sub-cycling control model. The details of the program to generate this figure are not discussed here. However, you can view the source in tutorial/2-control/2-subcycle.hh.
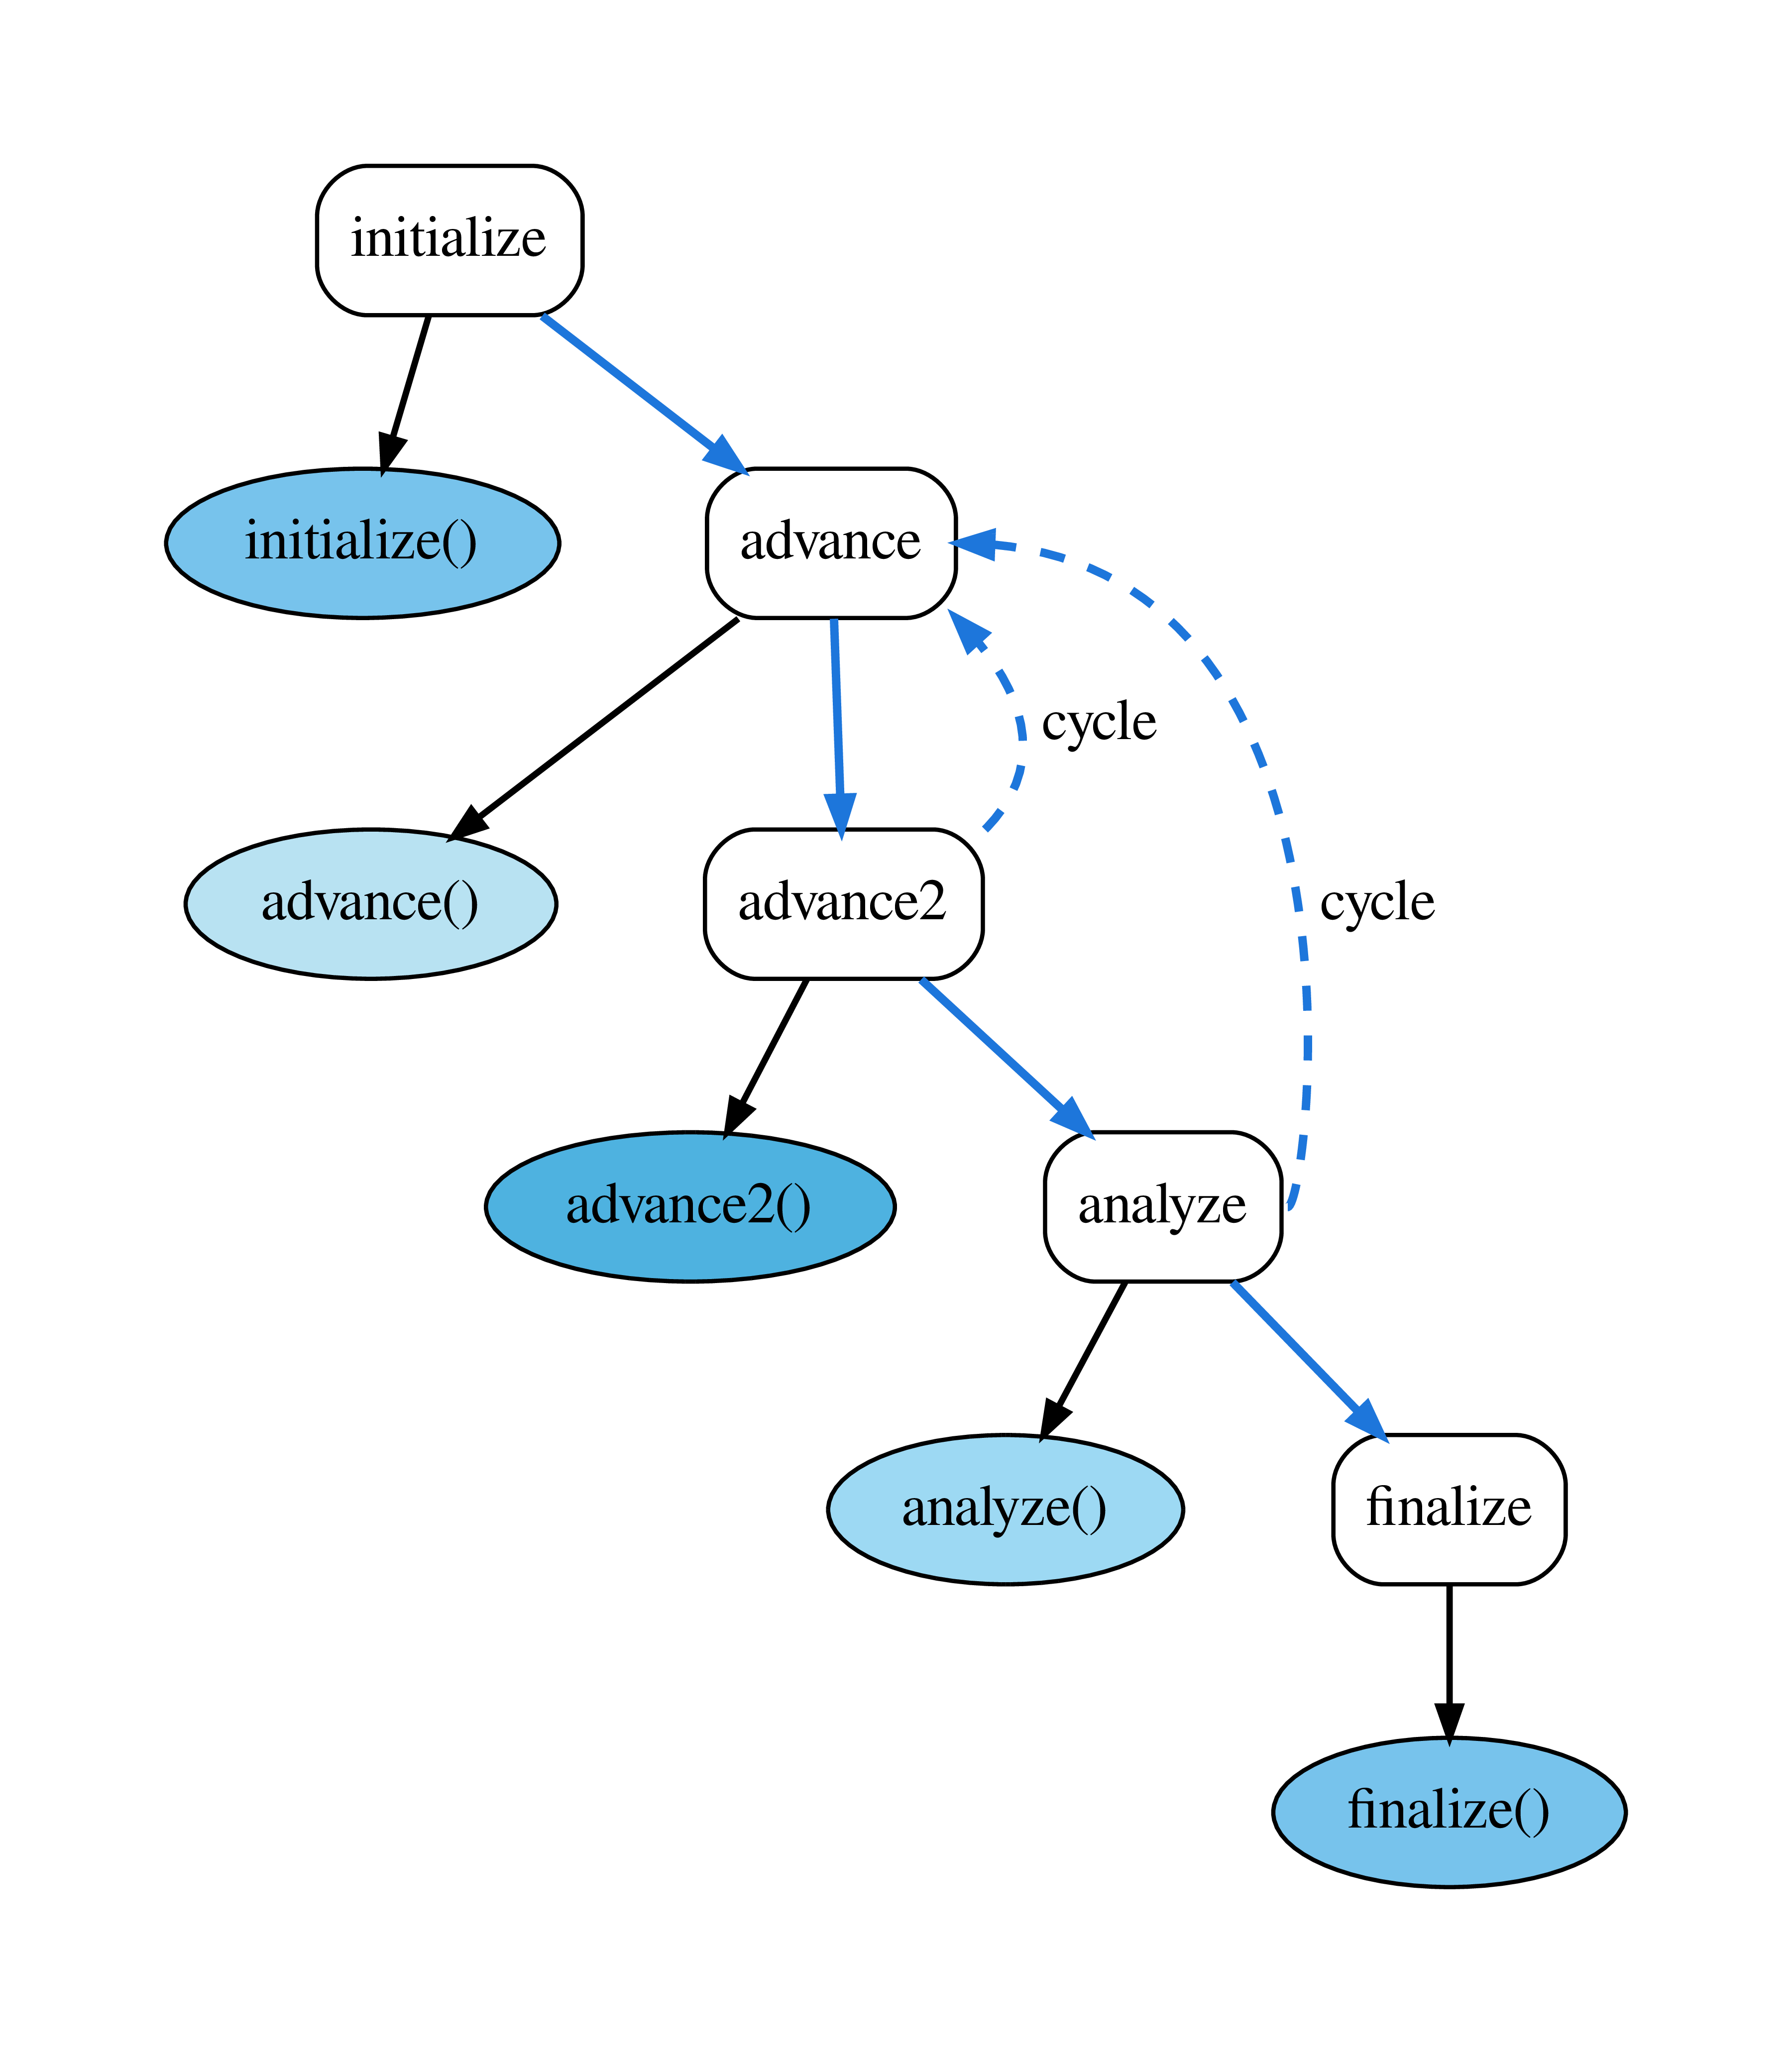
Fig. 7 Example FleCSI Control Model with Sub-cycles.